
【显卡驱动教程】笔记本双显卡安装过程(I卡+N卡)
Tofloor
poster avatar
walle
deepin
2017-06-22 03:45
Author
本帖最后由 walle 于 2017-6-22 20:01 编辑

这里记录安装过程,目前已经成功。既为自己备忘,又为深度提供参考成功过程直接看12楼,前几楼都是之前折腾失败的过程。
其实也不复杂,只是之前都用的Ubuntu,然后用的nvidia-xserver-settings.更新
感谢15楼大佬!
archwiki
bumblebee配置下所有需要独显的操作都需要调用optirun或者primusrun
optirun -b none nvidia-settings -c :8


处理器: i7-6700hq
显卡: GTX950M
首先在驱动管理器中安装驱动,安装结束没有异常,如图所示

接下来打开NVIDIA X server settings ,异常出现,如下图

根据提示,sudo apt install nvidia-xconfig   安装之,接下来root账户执行nvidia-xconfig,可以看到

说明已经生成了/etc/X11/xorg.conf文件,可以打开看一下

  1. # nvidia-xconfig: X configuration file generated by nvidia-xconfig
  2. # nvidia-xconfig:  version 375.26  (buildd@debian)  Fri Jan 13 02:38:29 UTC 2017

  3. Section "ServerLayout"
  4.     Identifier     "Layout0"
  5.     Screen      0  "Screen0"
  6.     InputDevice    "Keyboard0" "CoreKeyboard"
  7.     InputDevice    "Mouse0" "CorePointer"
  8. EndSection

  9. Section "Files"
  10. EndSection

  11. Section "InputDevice"
  12.     # generated from default
  13.     Identifier     "Mouse0"
  14.     Driver         "mouse"
  15.     Option         "Protocol" "auto"
  16.     Option         "Device" "/dev/psaux"
  17.     Option         "Emulate3Buttons" "no"
  18.     Option         "ZAxisMapping" "4 5"
  19. EndSection

  20. Section "InputDevice"
  21.     # generated from default
  22.     Identifier     "Keyboard0"
  23.     Driver         "kbd"
  24. EndSection

  25. Section "Monitor"
  26.     Identifier     "Monitor0"
  27.     VendorName     "Unknown"
  28.     ModelName      "Unknown"
  29.     HorizSync       28.0 - 33.0
  30.     VertRefresh     43.0 - 72.0
  31.     Option         "DPMS"
  32. EndSection

  33. Section "Device"
  34.     Identifier     "Device0"
  35.     Driver         "nvidia"
  36.     VendorName     "NVIDIA Corporation"
  37. EndSection

  38. Section "Screen"
  39.     Identifier     "Screen0"
  40.     Device         "Device0"
  41.     Monitor        "Monitor0"
  42.     DefaultDepth    24
  43.     SubSection     "Display"
  44.         Depth       24
  45.     EndSubSection
  46. EndSection
Copy the Code
目前为止看起来一切正常,那么继续重启,可以发现黑屏,进入不了系统。
进tty2,将/etc/X11/xorg.conf删除,再重启,即可进入系统,点开nvidia x server settings ,还是老样子


Reply Favorite View the author
All Replies
avatar
walle
deepin
2017-06-22 03:51
#1
为什么安装失败呢,试着从命令行用root 启动nvidia-settings,发现了一个错误,如下图
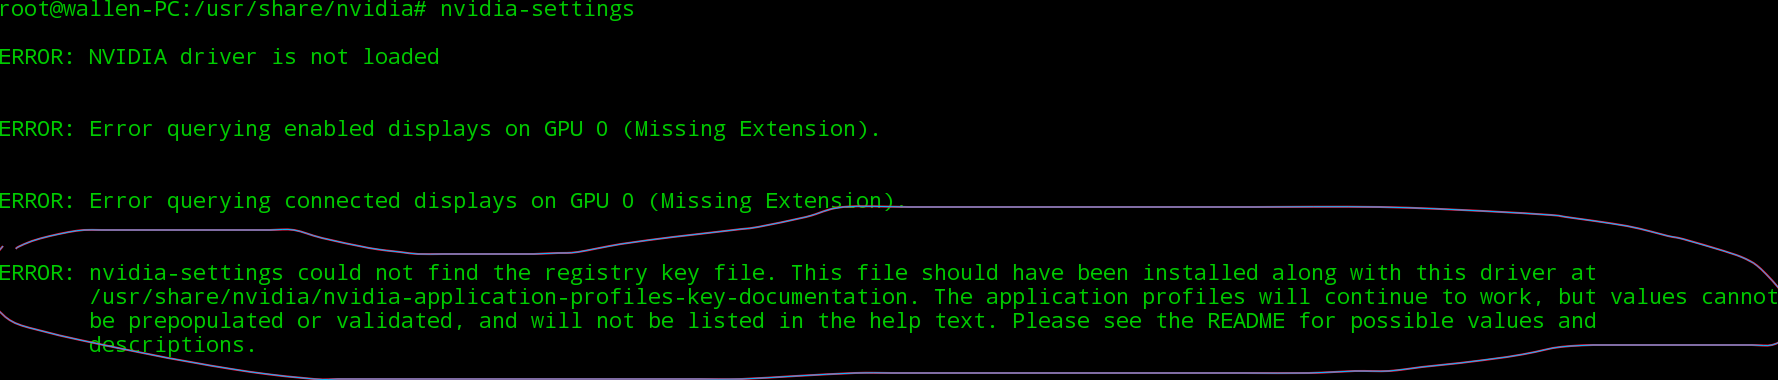
说明找不到这个文件,进入目录,发现有两个文件
nvidia-application-profiles-375.26-key-documentation  以及
nvidia-application-profiles-375.26-rc

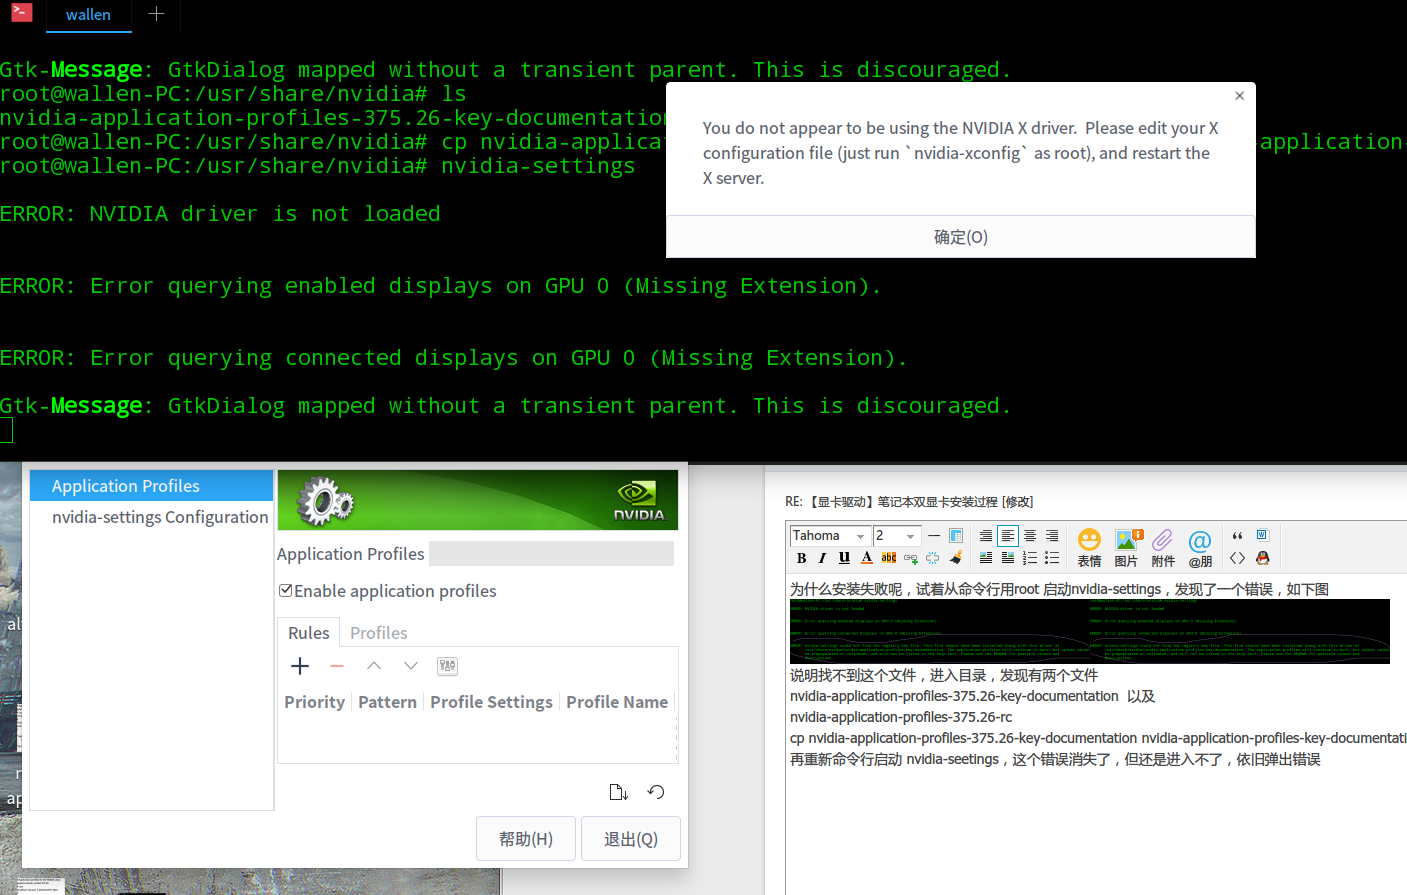
cp nvidia-application-profiles-375.26-key-documentation nvidia-application-profiles-key-documentation
再重新命令行启动 nvidia-seetings,这个错误消失了,但还是进入不了,依旧弹出错误
Reply View the author
avatar
walle
deepin
2017-06-22 03:56
#2
https://bbs.deepin.org/user/48640   这个过程应该是比较规范的,烦请看一下。现在的情况就是按照这个流程依旧安装失败
Reply View the author
avatar
walle
deepin
2017-06-22 04:01
#3
  1. wallen@wallen-PC:~$ lspci
  2. 00:00.0 Host bridge: Intel Corporation Skylake Host Bridge/DRAM Registers (rev 07)
  3. 00:01.0 PCI bridge: Intel Corporation Skylake PCIe Controller (x16) (rev 07)
  4. 00:02.0 VGA compatible controller: Intel Corporation HD Graphics 530 (rev 06)
  5. 00:14.0 USB controller: Intel Corporation Sunrise Point-H USB 3.0 xHCI Controller (rev 31)
  6. 00:14.2 Signal processing controller: Intel Corporation Sunrise Point-H Thermal subsystem (rev 31)
  7. 00:16.0 Communication controller: Intel Corporation Sunrise Point-H CSME HECI #1 (rev 31)
  8. 00:17.0 SATA controller: Intel Corporation Sunrise Point-H SATA Controller [AHCI mode] (rev 31)
  9. 00:1c.0 PCI bridge: Intel Corporation Sunrise Point-H PCI Express Root Port #5 (rev f1)
  10. 00:1c.5 PCI bridge: Intel Corporation Sunrise Point-H PCI Express Root Port #6 (rev f1)
  11. 00:1e.0 Signal processing controller: Intel Corporation Sunrise Point-H Serial IO UART #0 (rev 31)
  12. 00:1f.0 ISA bridge: Intel Corporation Sunrise Point-H LPC Controller (rev 31)
  13. 00:1f.2 Memory controller: Intel Corporation Sunrise Point-H PMC (rev 31)
  14. 00:1f.3 Audio device: Intel Corporation Sunrise Point-H HD Audio (rev 31)
  15. 00:1f.4 SMBus: Intel Corporation Sunrise Point-H SMBus (rev 31)
  16. 01:00.0 3D controller: NVIDIA Corporation GM107M [GeForce GTX 950M] (rev ff)
  17. 02:00.0 Network controller: Intel Corporation Intel Dual Band Wireless-AC 3165 Plus Bluetooth (rev 99)
  18. 03:00.0 Ethernet controller: Realtek Semiconductor Co., Ltd. RTL8111/8168/8411 PCI Express Gigabit Ethernet Controller (rev 15)
  19. wallen@wallen-PC:~$ lspci -nn | grep NVIDIA
  20. 01:00.0 3D controller [0302]: NVIDIA Corporation GM107M [GeForce GTX 950M] [10de:139a] (rev ff)
  21. wallen@wallen-PC:~$ lspci |grep -i 'VGA'
  22. 00:02.0 VGA compatible controller: Intel Corporation HD Graphics 530 (rev 06)
  23. wallen@wallen-PC:~$ lspci -knn|grep -iA2 'vga\|3d'
  24. 00:02.0 VGA compatible controller [0300]: Intel Corporation HD Graphics 530 [8086:191b] (rev 06)
  25.         Subsystem: Lenovo HD Graphics 530 [17aa:380a]
  26.         Kernel driver in use: i915
  27. --
  28. 01:00.0 3D controller [0302]: NVIDIA Corporation GM107M [GeForce GTX 950M] [10de:139a] (rev ff)
  29.         Kernel modules: nvidia
  30. 02:00.0 Network controller [0280]: Intel Corporation Intel Dual Band Wireless-AC 3165 Plus Bluetooth [8086:3166] (rev 99)
Copy the Code
Reply View the author
avatar
fanf6g
deepin
2017-06-22 04:07
#4
想顺利用上独立显卡,还是老老实实用ubuntu吧!
Reply View the author
avatar
9***8@qq.com
deepin
2017-06-22 04:33
#5
老司机告诉你,
干掉bumblebee,才能装官方的闭源驱动.
bumblebee这个垃圾,真是大毒瘤.
Reply View the author
avatar
walle
deepin
2017-06-22 04:37
#6
https://bbs.deepin.org/post/141410
老司机告诉你,
干掉bumblebee,才能装官方的闭源驱动.
bumblebee这个垃圾,真是大毒瘤. ...

老司机指教下,,或者扔几个链接。以前再ubuntu都是没有问题的,deepin下安装不上驱动
Reply View the author
avatar
walle
deepin
2017-06-22 04:38
#7
确实也怀疑过是bumblebee的问题,不过不确定。   deepin下改怎么操作呢
Reply View the author
avatar
9***8@qq.com
deepin
2017-06-22 04:47
#8
https://bbs.deepin.org/post/141410
确实也怀疑过是bumblebee的问题,不过不确定。   deepin下改怎么操作呢

第一步干掉bumblebee,第二步删光nouveau的开源支持
第三步装入nvidria-prime,然后再拷入nvidia X server,一个拷字,你就知道我试过了多少方案.
没错,我分区装上ubuntu,拷入同址文件搞定了.
deepin的私有软件,不少依赖nouveau的支援,会导致很多软件使用不正常.
最后感觉太恶心了,改投ubuntu
Reply View the author
avatar
walle
deepin
2017-06-22 04:57
#9
https://bbs.deepin.org/post/141410
第一步干掉bumblebee,第二步删光nouveau的开源支持
第三步装入nvidria-prime,然后再拷入nvidia X server, ...

deepin现在基于debian  源里没有nvidia-prime了,,
Reply View the author
Comments
lineme
2017-06-22 04:59
手装deb包
https://packages.ubuntu.com/search?keywords=nvidia-prime&searchon=names
avatar
walle
deepin
2017-06-22 05:53
#10
https://bbs.deepin.org/post/141410
第一步干掉bumblebee,第二步删光nouveau的开源支持
第三步装入nvidria-prime,然后再拷入nvidia X server, ...

安上了nvidia prime。没反应啊。。
Reply View the author
Comments
lineme
2017-06-22 07:34
nvidia X server
avatar
walle
deepin
2017-06-22 07:59
#11
本帖最后由 walle 于 2017-6-22 20:02 编辑

## Deepin 15.4 笔记本安装显卡驱动(I卡+N卡)
linux下有两种N+I双卡的方案,一个是ubuntu下的nvidia-prime,另一个就是debian下的bumblebee。目前deepin基于debian,而debian只打包了第三种bumblebee,所以只能用后者。   
ubuntu的nvidia-prime如果要切换显卡,必须要重启X session,因为在X启动的时候nvidia的驱动模块就已经加载了,也就是说独显是一直在工作的。而debian采用bumblebee,开机加载的是intel的驱动,程序默认也都是用intel的集显,如果需要用独显要用optirun运行程序,这样能做到最大程度的提高电池续航能力。目前debian的nvidia-driver,nvidia-legacy-driver都是默认bumblebee解决双显卡,X启动时,驱动是intel,glx是mesa的glx,但是有些硬件可能会出现驱动是intel,glx却是nvidia的情况,这就会导致opengl的程序跑不起来,需要手动执行sudo update-alternatives --config glx来选择。
两种实现其实各有利弊,debian当前也没有打包prime的打算打包方式不同,debian这边没有打包适配prime的驱动,加prime支持要改东西太多,所以就只用大黄蜂了。
* 删除以往所有安装的驱动/大黄蜂
```
sudo apt remove --purge nvidia*
sudo apt remove --purge bumblebee*
```
* 打开驱动管理器,点击驱动进行安装
* 再确保安装一些相关软件
```
sudo apt-get install bumblebee-nvidia bumblebee primus
sudo apt-get install nvidia-driver nvidia-settings
```
* 检查驱动是否安装成功,安装mesa-utils这个包,用来显示系统的glx相关信息。用optirun调用独显输出系统的glxinfo来查看驱动是否安装成功。  
```
sudo apt-get install mesa-utils  
optirun glxinfo|grep NVIDIA  
```
* 使用独显启动程序
```
optirun command #使用独显运行command程序
primusrun command #另外一种使用独显运行程序方法
optirun -b primus command #使用独显运行command程序,提升性能
```
* 可以安装 nvidia-smi,sudo nvidia-smi执行之,可以看到驱动已经安装,设备正常运转
* 测试 Bumblebee 是否支持你的 Optimus 系统:如果在终端中看到一个关于你的 Nvidia 的提示和齿轮,恭喜你,Bumblebee 和 Optimus 已经开始工作了。
```
optirun glxgears -info
```
* 执行 sudo lspci -v 可以查看到详细信息
* 在使用optirun命令开启独显前,可以使用lspci命令查看设备,可以看到独显最后的信息为(rev ff).ff代表设备关闭  
使用optirun命令后,再次lspci,可以看到独显最后的信息为(rev a2),这代表独显已经正常使用了  
* bumblebee配置下所有需要独显的操作都需要调用optirun或者primusrun.如果打开nvidia-settings时提示“You do not appear to be using the NVIDIA X driver”,在terminal中运行如下命令
```
optirun -b none nvidia-settings -c :8
```
这里解释一下上述命令.man optirun可以看到如下关于-b的信息
```
-b, --bridge METHOD
              acceleration/displaying  bridge to use. Valid values are auto, virtualgl and primus. The --vgl-* options only make sense
              when using the virtualgl bridge, while the --primus-* options apply only when using the  primus  bridge.   Additionally,
              value  none is recognized, and its effect is to add paths to driver libraries to LD_LIBRARY_PATH (useful for nvidia-set‐
              tings and CUDA applications)
```
man nvidia-settings可以看到如下信息
```
-c CTRL-DISPLAY, --ctrl-display=CTRL-DISPLAY
              Control the specified X display.  If this option is not given, then nvidia-settings will control the display specified by '--dis‐
              play' ; if that is not given, then the $DISPLAY environment variable is used.
```
由此可见-c后面跟的:8是屏幕显示的代码。查看bumblebee文件
```
sudo gedit /etc/bumblebee/bumblebee.conf
```
可以发现如下一段,由此可以解释上述命令了。
```
[bumblebeed]
# The secondary Xorg server DISPLAY number
VirtualDisplay=:8
```
* 在steam中使用独显来运行游戏,在游戏上右键,set launch options中加入
```
optirun -b primus %command%
```
* 开机黑屏拯救方法
```
sudo apt remove --purge nvidia*  //适用于安装了不正确的闭源驱动
sudo rm /etc/X11/xorg.conf  //适用于生成了不正确的xorg.conf文件
sudo apt install xorg  //适用于删除nvidia时误删了xorg
```
* reference:  
1: https://wiki.deepin.org/index.php?title=%E6%98%BE%E5%8D%A1  
2:https://wiki.archlinux.org/index.php/Bumblebee

Reply View the author
avatar
walle
deepin
2017-06-22 08:06
#12
黑屏/进不去系统  救急三法
ctrl+alt+2进入2号控制台
1: sudo apt remove --purge nvidia*
2:   sudo rm /etc/X11/xorg.conf
3:   sudo apt install xorg
三种原因各不同,不详细说了,挨个试 总有一款能救你


再给各位忠告,也是deepin wiki上写的
自行下载官网的闭源驱动,更新闭源新版驱动,会随机出现的严重vlinuz启动内核编译失败,导致系统无法引导至图形界面,而且即使编译成功,也并不能保证与闭源驱动版本号准确对应,同样会造成系统无法引导至图形界面。使用“附加驱动”内提供的闭源驱动相对安全一些,风险也较低。

不是危言耸听,听人劝吃饱饭

完结撒花
Reply View the author
avatar
walle
deepin
2017-06-22 08:08
#13
再加几句。我一二楼折腾的那么多,什么nvidia-xconfig  生成xorg.conf文件什么的都是针对单显卡单N卡独显的情况,英伟达官网给出的驱动,有很多支持的显卡型号,也是针对单独显N卡而言。笔记本单显卡不一定适用
Reply View the author
avatar
liujianfeng
deepin
2017-06-22 17:16
#14
本帖最后由 liujianfeng 于 2017-6-22 09:17 编辑

archwiki
bumblebee配置下所有需要独显的操作都需要调用optirun或者primusrun
optirun -b none nvidia-settings -c :8
Reply View the author
avatar
walle
deepin
2017-06-22 17:20
#15
https://bbs.deepin.org/post/141410
archwiki
bumblebee配置下所有需要独显的操作都需要调用optirun或者primusrun
optirun -b none nvidia-sett ...

感谢大佬!
Reply View the author
avatar
jingle
deepin
2017-06-22 17:23
#16
Reply View the author
avatar
mut
deepin
2017-08-21 21:11
#17
怎么看现在使用的是独显还是集显
Reply View the author
avatar
q1377195627
deepin
2017-08-22 00:18
#18
https://bbs.deepin.org/post/141410
想顺利用上独立显卡,还是老老实实用ubuntu吧!

哈?顺利上独显为何要老老实实ubuntu,arch上我直接装完就驱动了,就几个包,什么都不干,直接装完启动大黄蜂服务重启,ubuntu?还要各种配置
Reply View the author